
User guide
Using Vistra System
Two Windows apps: Vistra System on the clinic PC, Waiting Room on the TV. Then Clinician Hub for Call In.
Install
Where: Download page
Vistra System (clinic PC)
- Download and install Vistra System on the doctor or reception PC.
- Sign in with the organisation account to open Vistra settings (screen, layout, call-in, permissions).
- Clinicians sign in on the same app to open Clinician Hub.
Waiting Room (TV PC)
- Do not install Vistra System on the TV PC.
- Download the Waiting Room ZIP and copy the folder to the TV PC.
- On the clinic PC, start Vistra System and the wireless web server. Note the IP.
- On the TV PC run Configure-WaitingRoom.bat, then Install-Autostart.bat.
HDMI: plug the TV into the clinic PC and use Screen → Open on selected screen. The Waiting Room app is not needed.
1. Sign in
Where: Windows app start screen
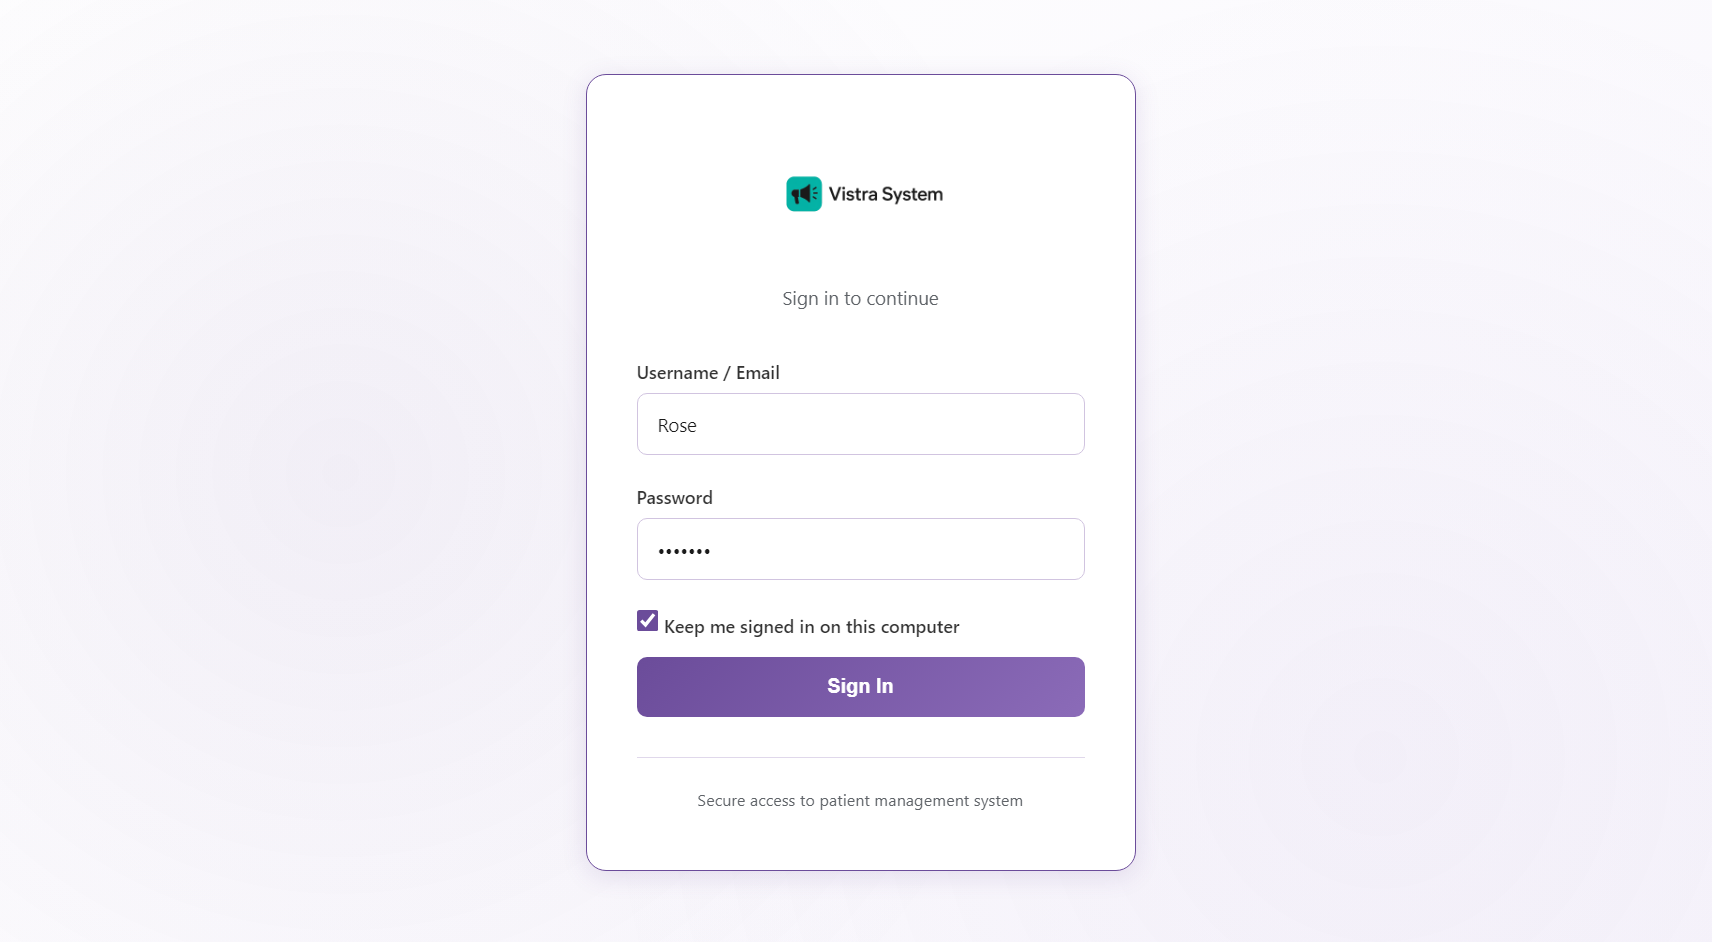
- Enter your clinic username (same as your practice / aggregator login).
- Enter your password.
- Tick Keep me signed in on this computer if this PC is used every day by the same person.
- Click Sign In.
Organisation login opens Vistra settings. Clinician login opens Clinician Hub. Platform admins use the website Login page with an admin email instead.
2. Choose your duty room
Where: popup after login (or Settings → General → Change room for today)
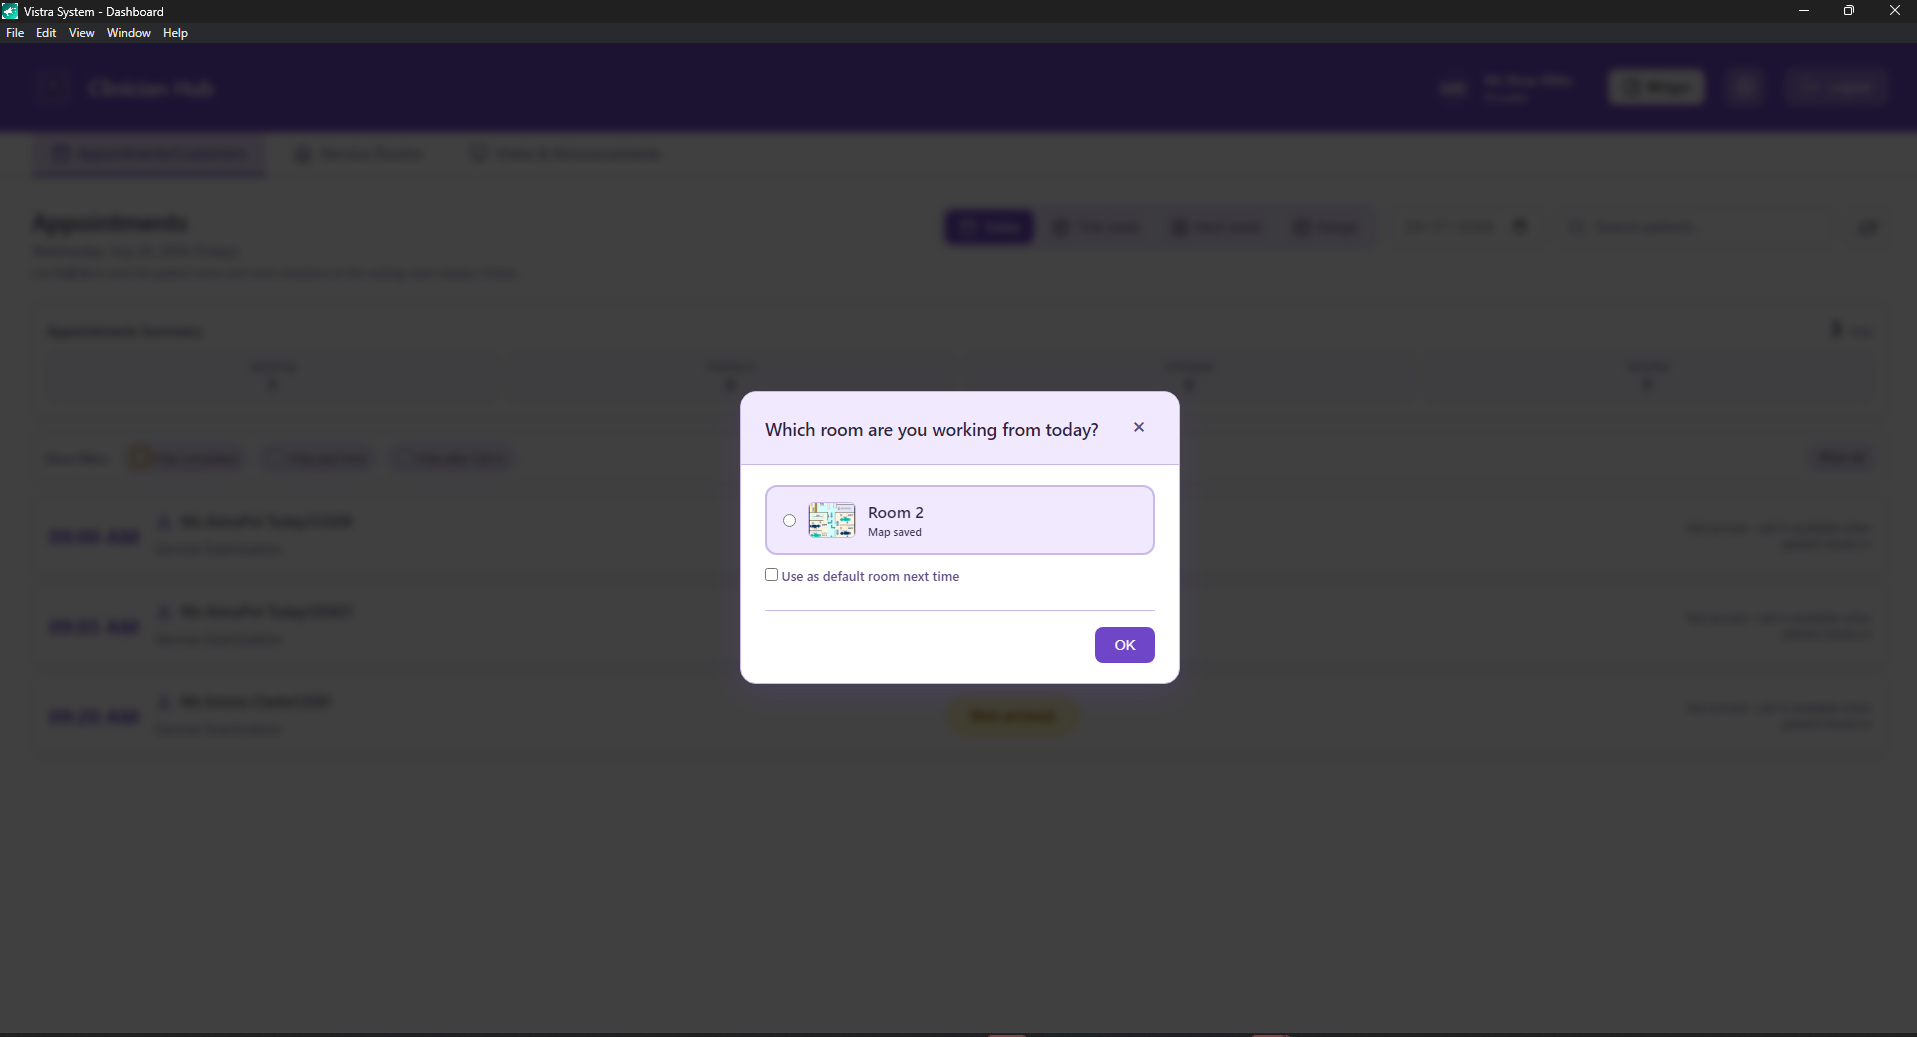
- Select the room you are working from today.
- Tick Use as default room next time to skip this prompt on the next login.
- Click OK.
Call-in messages show this room's name, map, and directions on the waiting-room screen.
3. Appointments list
Where: Clinician Hub → Appointments/Customers
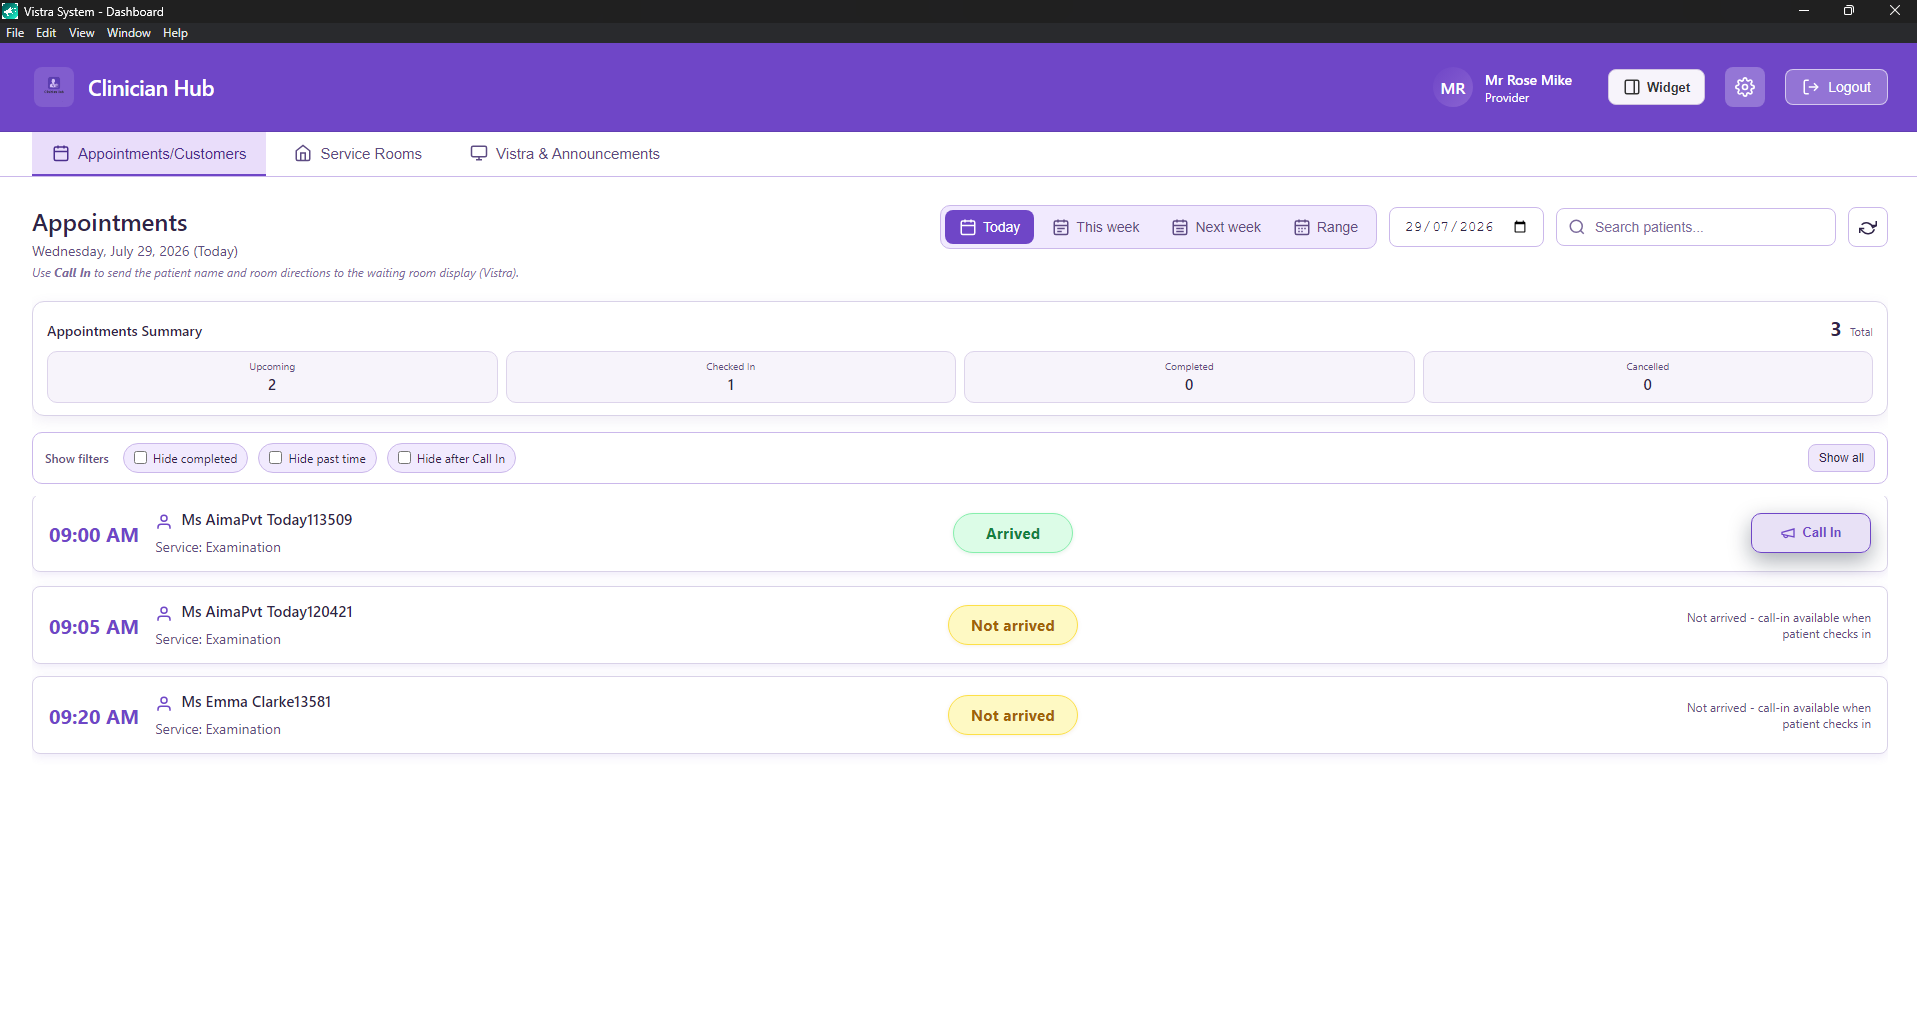
Top bar
- Widget — compact floating window (see Widget mode).
- Settings (gear) — theme, account, filters, Vistra options.
- Logout — end session.
Date & filters
- Today / This week / Next week / Range — change which appointments load.
- Date picker — jump to a specific day.
- Search patients — filter by name.
- Refresh — reload from the aggregator API.
Summary chips
Total, Upcoming, Checked In, Completed, Cancelled — quick counts for the selected day.
List filters
- Hide completed — remove finished visits from the list.
- Hide past time — hide appointments whose start time has passed.
- Hide after Call In — hide a row after the call-in announcement finishes.
- Show all — clear those filters.
Each row
- Time, patient name, service.
- Status badge: Arrived (green) or Not arrived (yellow).
- Call In appears only when the patient has arrived / checked in.
4. Call a patient in
Where: Appointments row → Call In
- Wait until the patient status is Arrived.
- Click Call In (megaphone).
- If "Send call-in immediately" is off, a short edit popup appears - confirm or tweak the message, then send.
- The waiting-room TV shows the message (and plays sound / voice if enabled).
If you see "Not arrived - call-in available when patient checks in", the practice system has not marked them arrived yet.
5. Widget mode
Where: Clinician Hub top bar → Widget
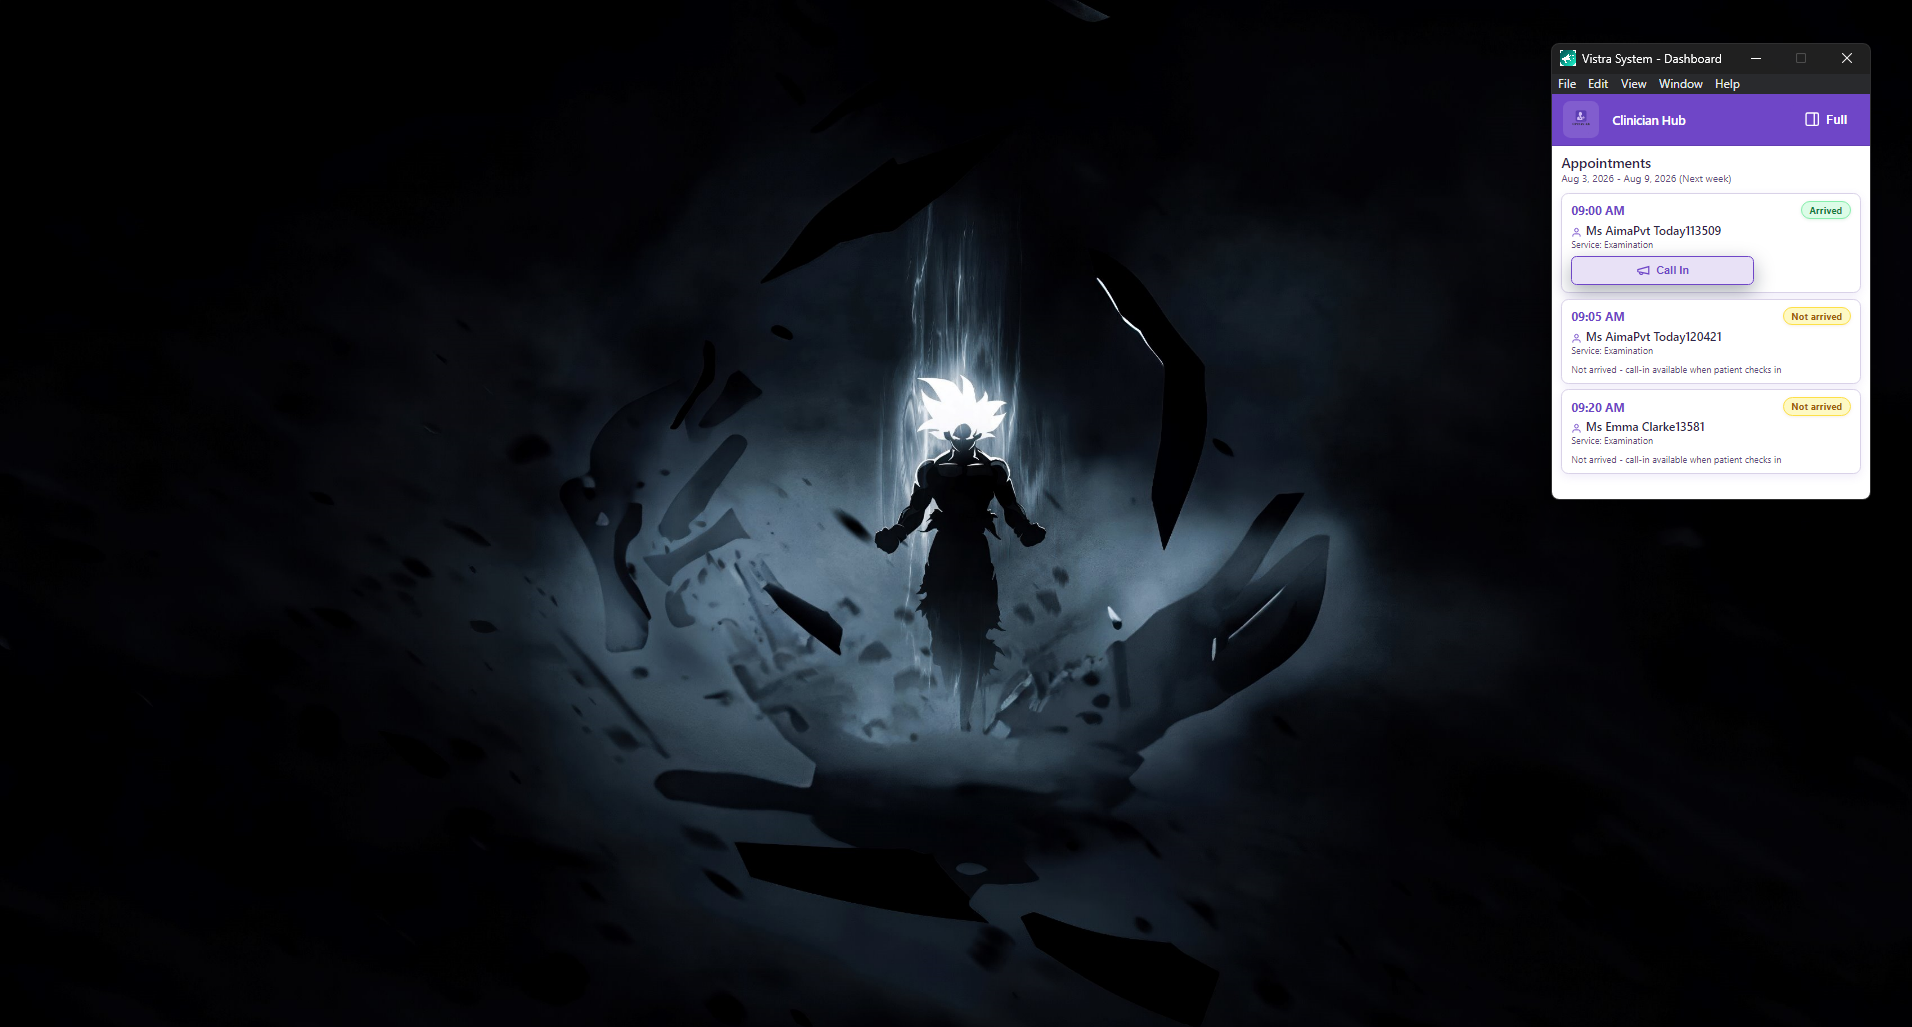
- Opens a small floating window that stays usable while you work in other apps.
- Shows the selected day / range (e.g. today or next week) with patient cards.
- Arrived (green) → Call In button is available.
- Not arrived (yellow) → Call In stays locked until the patient checks in.
- Click Full (top right of the purple bar) to return to the full Clinician Hub.
- Settings → General can limit how many patients show and shrink the window.
6. Service rooms
Where: Clinician Hub → Service Rooms
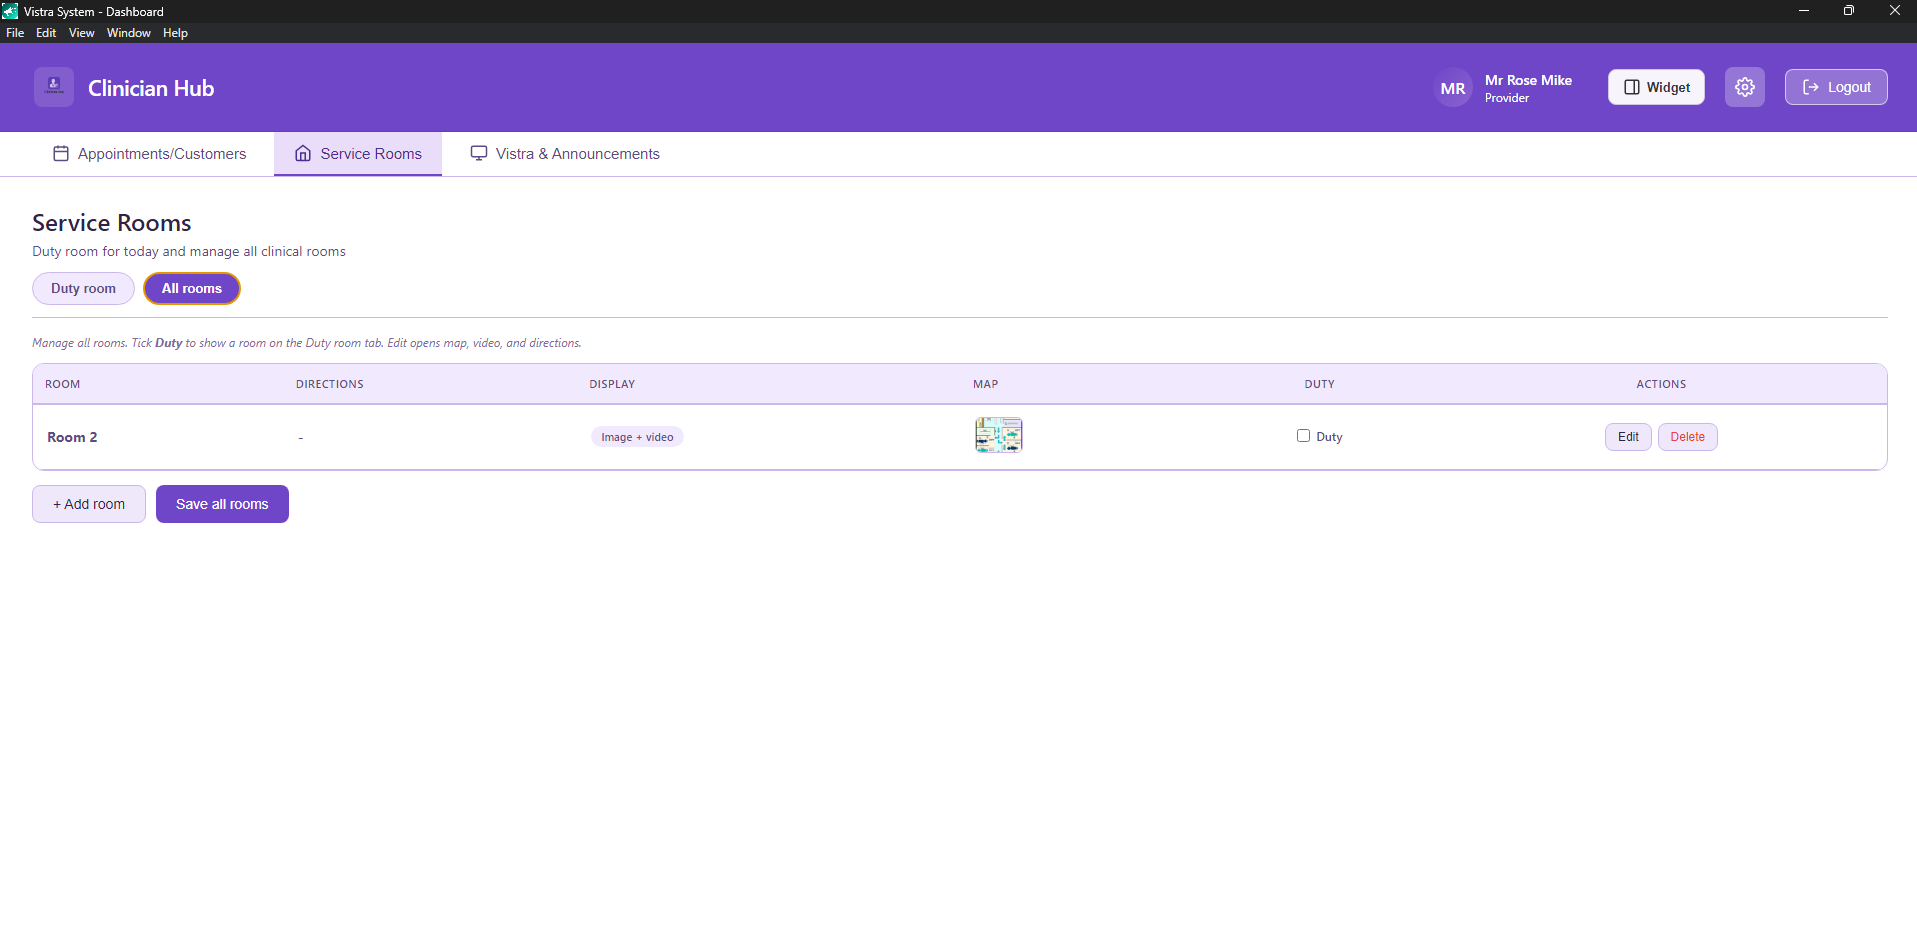
- Duty room tab — rooms marked for today's duty list.
- All rooms — full clinic list.
- Duty checkbox — tick so the room appears on the Duty room tab / picker.
- Display — what patients see (e.g. Image + video).
- Map — thumbnail of the floor / room map.
- Edit / Delete — change or remove a room.
- + Add room then Save all rooms.
7. Add or edit a room
Where: Service Rooms → + Add room or Edit
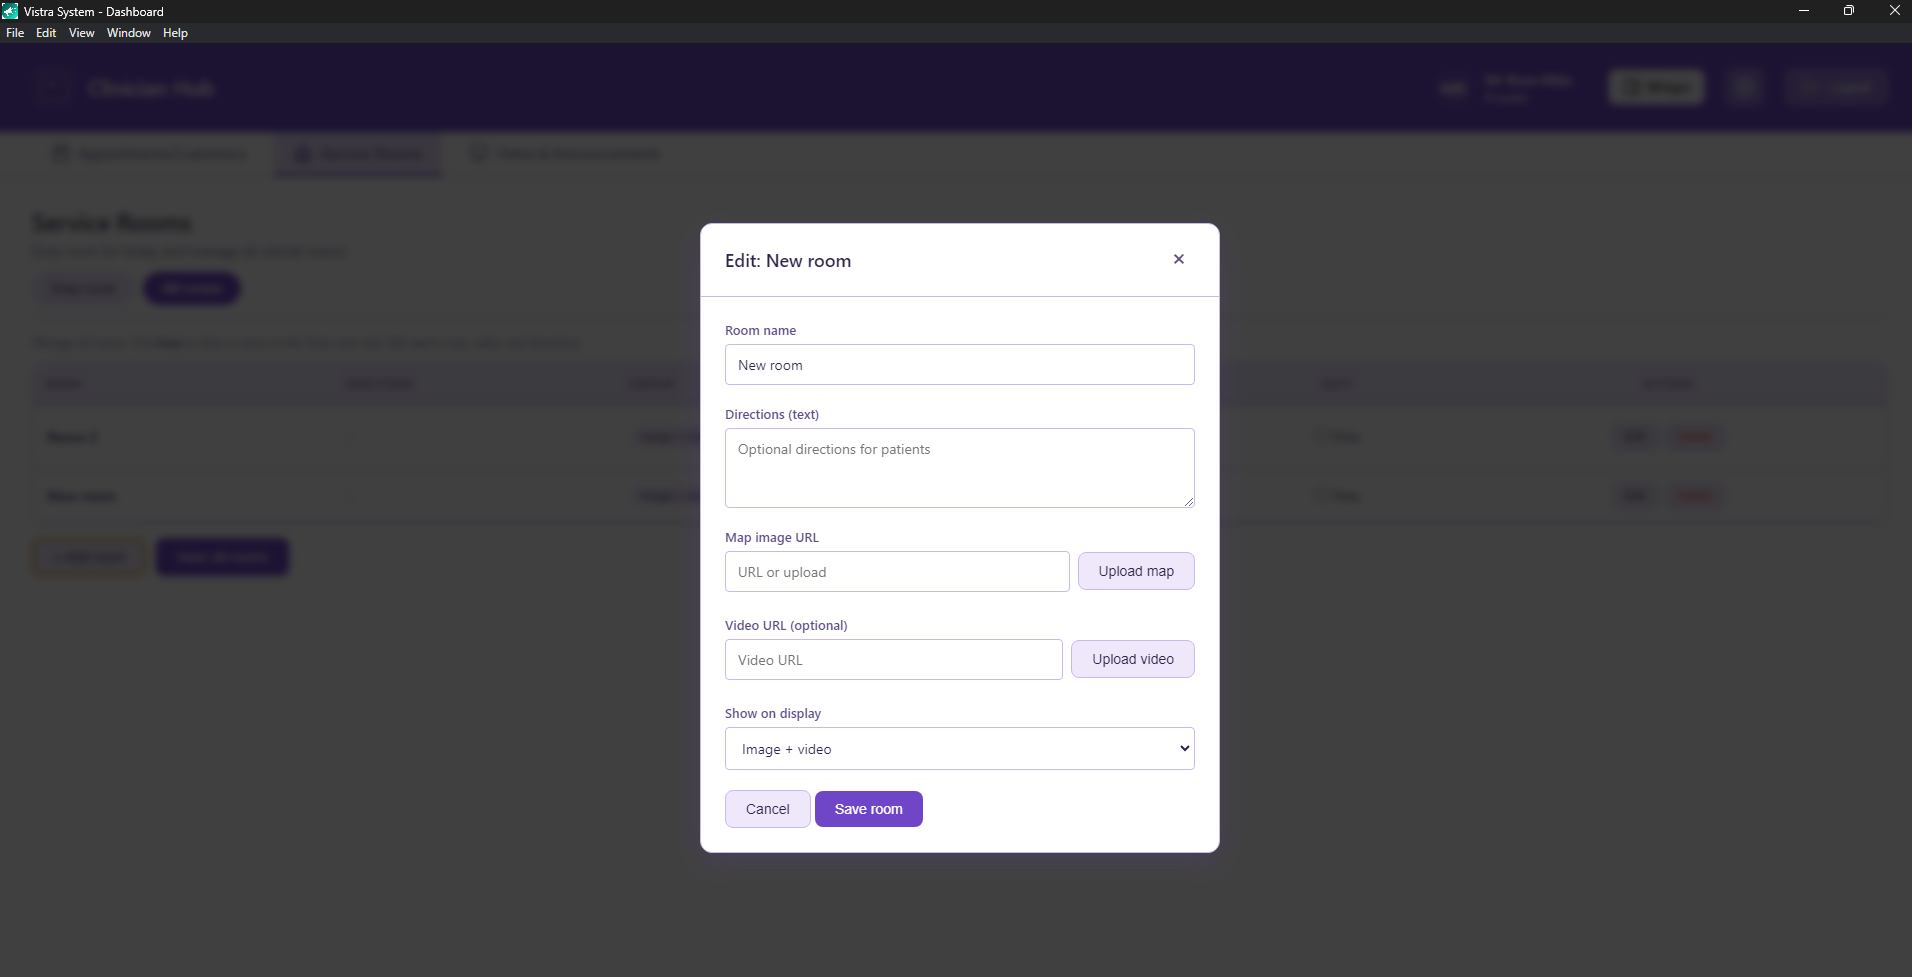
| Setting | What it does |
|---|---|
| Room name | Shown in Call In and on the TV (e.g. Room 2). |
| Directions | Optional text for patients ("Left corridor, third door"). |
| Map image URL / Upload map | Floor plan or path image on the waiting-room screen. |
| Video URL / Upload video | Optional clip for Full call-in mode. |
| Show on display | Choose Image, Video, or Image + video. |
Click Save room, then Save all rooms on the list if needed.
8. Waiting-room Screen tab
Where: Vistra & Announcements → Screen
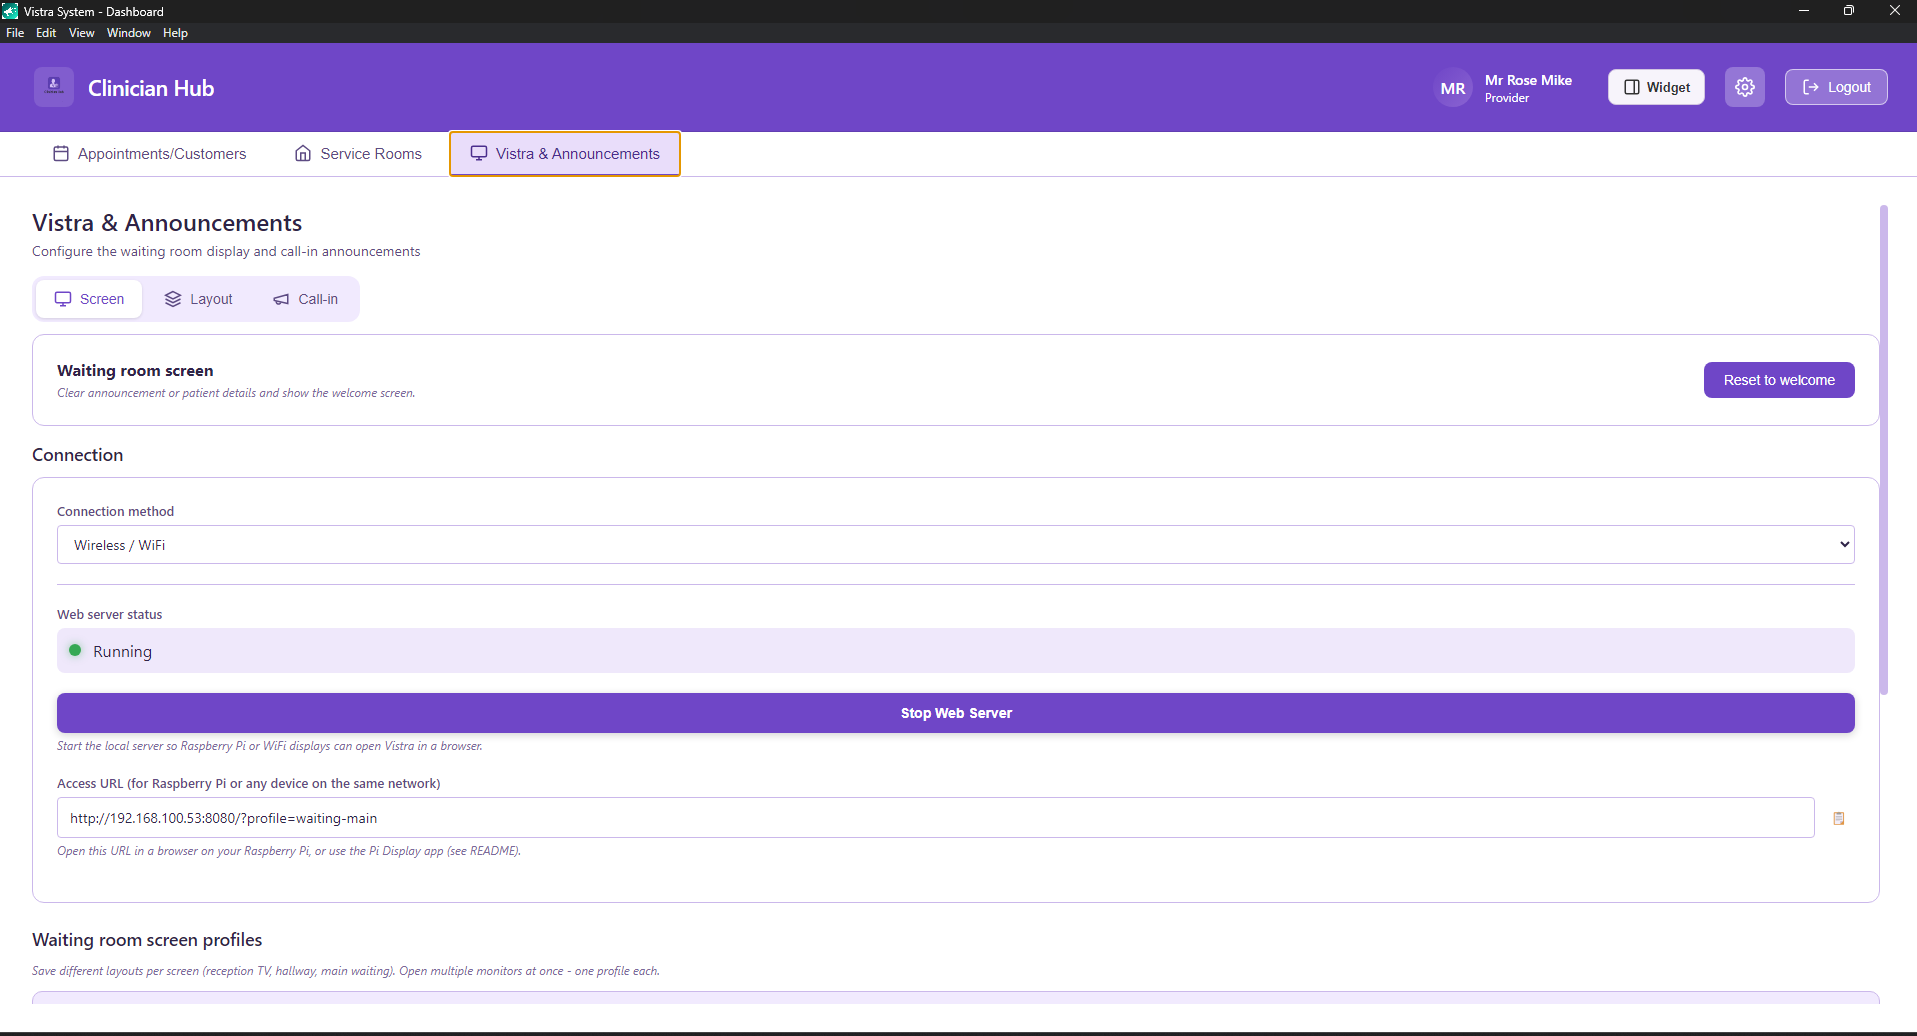
- Reset to welcome — clear the current call-in / announcement and show the welcome screen on the TV.
- Connection — e.g. Wireless / WiFi for how displays reach this PC.
- Start / Stop Web Server — local server for Raspberry Pi or browser TVs. Status shows Running when ready.
- URL — open this link on the TV / Pi (copy button). Example shape:
http://...:8080/?profile=waiting-main. - Waiting room screen profiles — different layouts for reception TV, hallway, main waiting (one profile per monitor).
9. Layout, colours & text sizes
Where: Vistra & Announcements → Layout
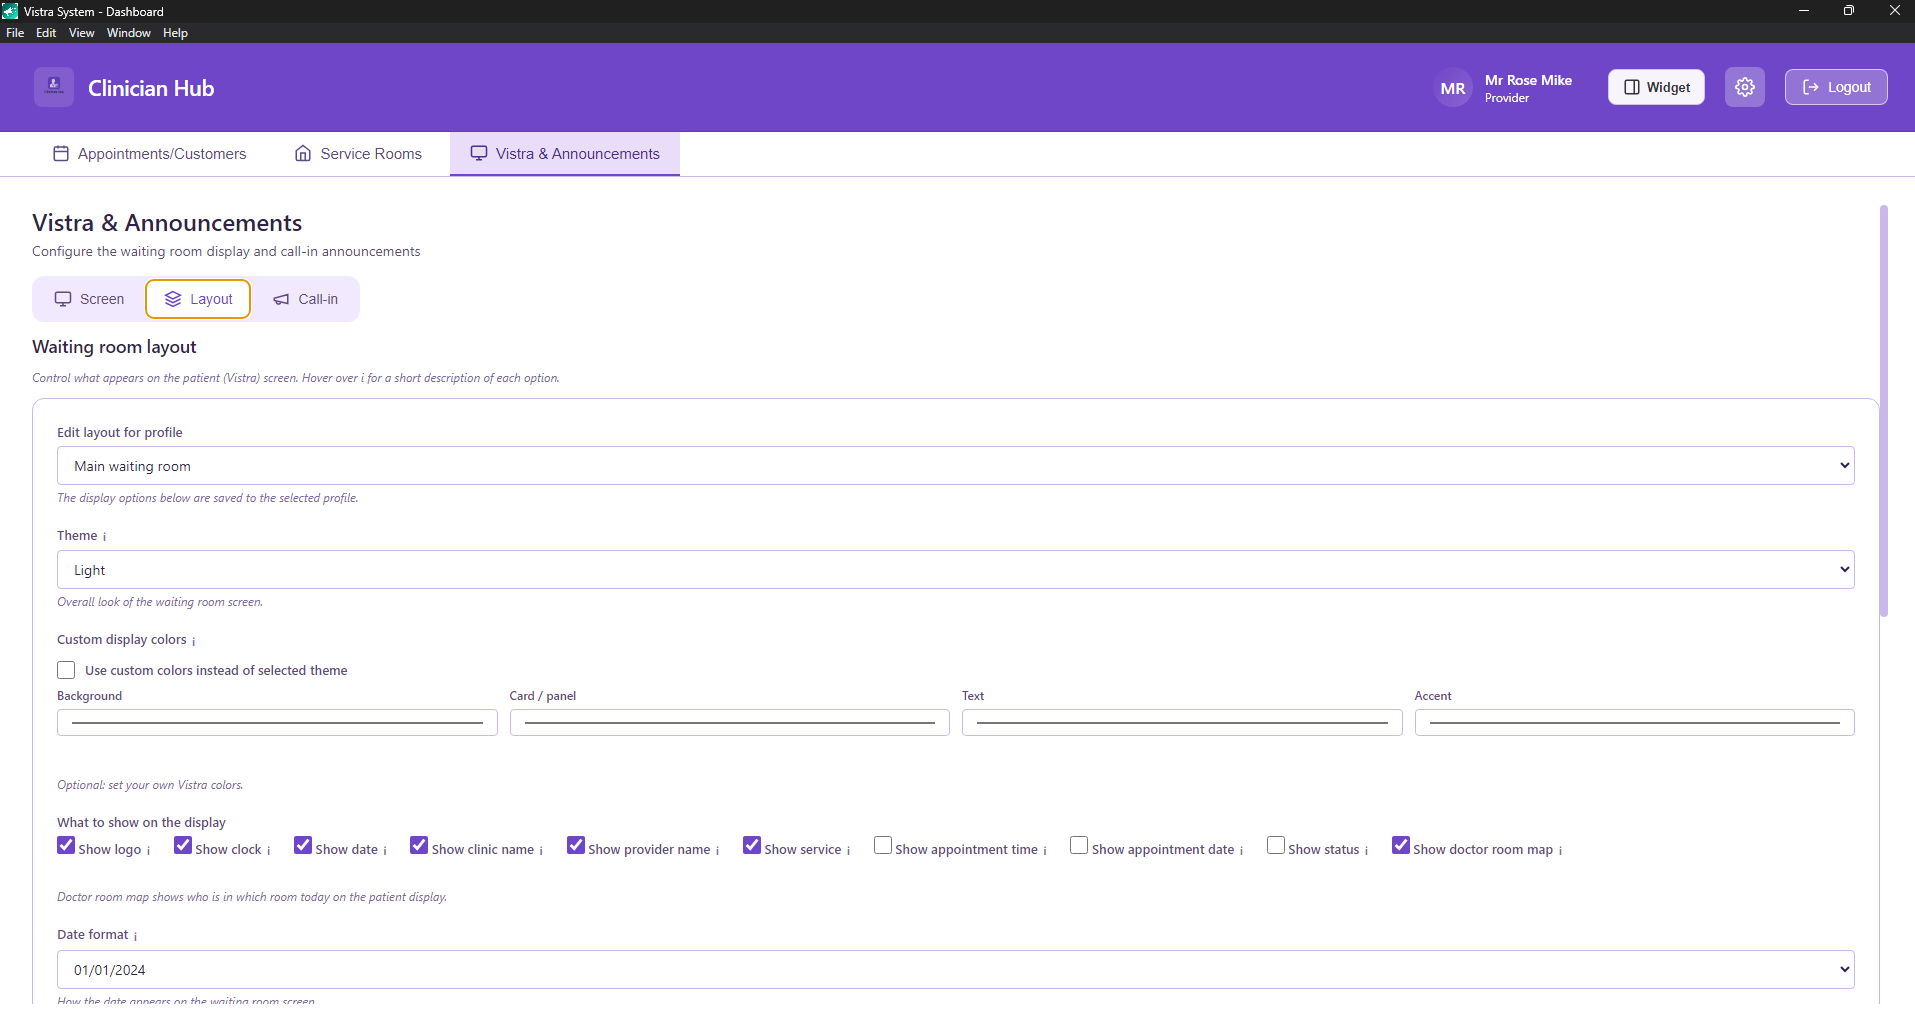
| Setting | What it does |
|---|---|
| Edit layout for profile | Which TV profile you are editing (e.g. Main waiting room). |
| Theme | Overall Light / Dark look of the patient screen. |
| Use custom colors | Override theme with Background, Card, Text, Accent colours. |
| What to show | Toggles: logo, clock, date, clinic name, provider, service, room map, appointment time/date, status. |
| Date / time format | How clock and date look on the TV. |
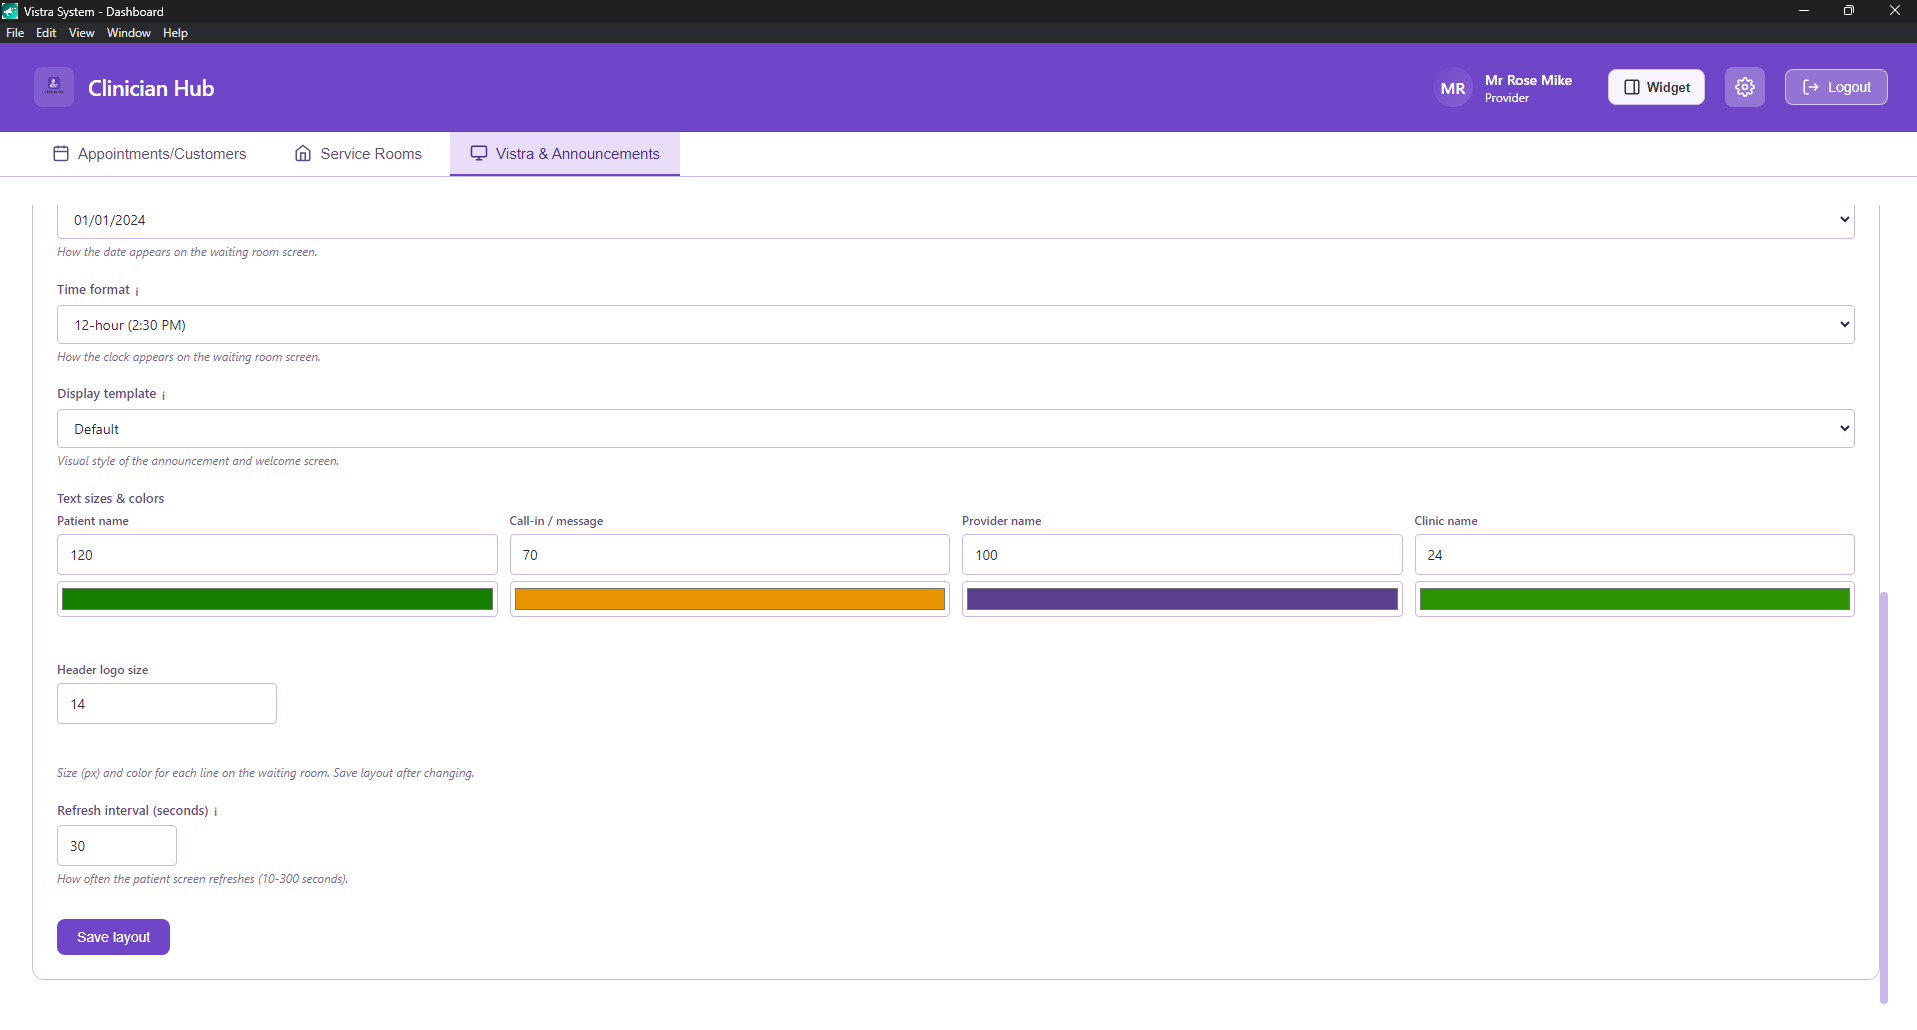
- Patient name / Call-in message / Provider / Clinic — size (px) and colour for each line.
- Header logo size — logo scale on the TV.
- Display template — visual style of welcome / announcement.
- Refresh interval — how often the patient screen refreshes (10-300 seconds).
- Always click Save layout after changes.
10. Call-in message text
Where: Vistra & Announcements → Call-in → Message
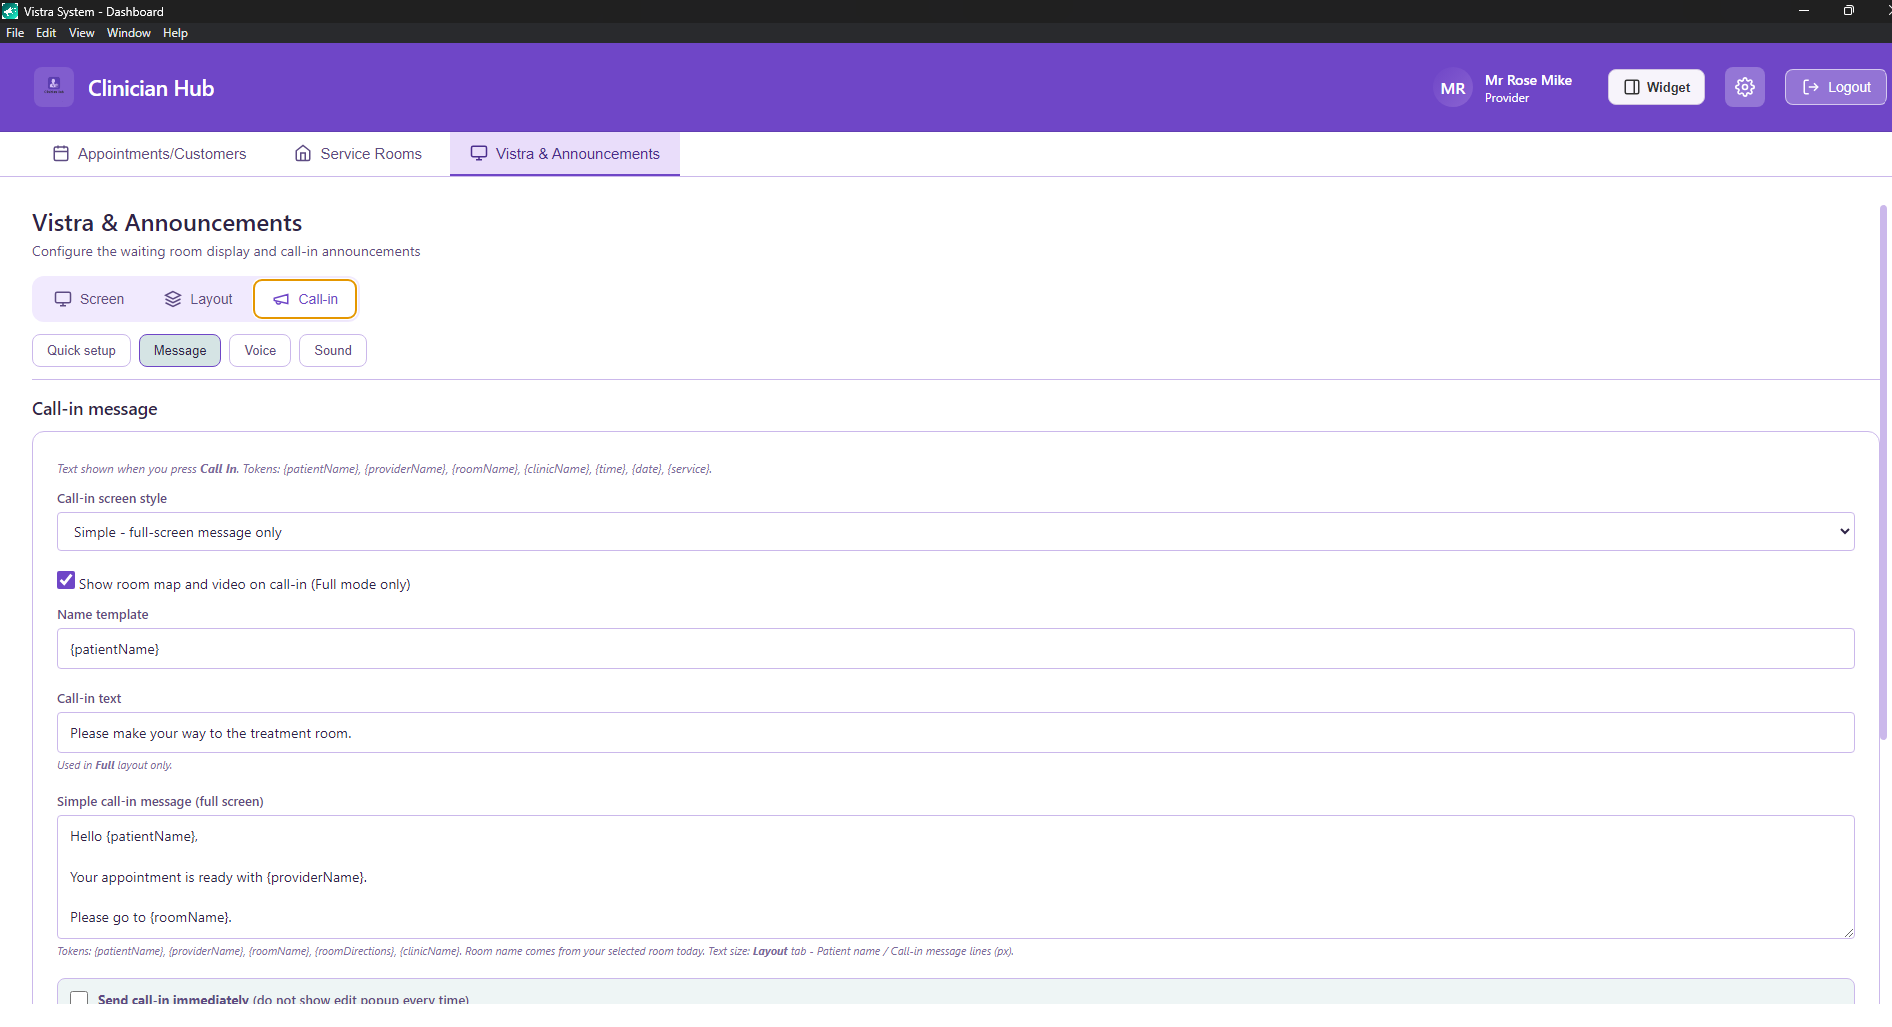
| Setting | What it does |
|---|---|
| Call-in screen style | Simple (full-screen text) or Full (map / video too). |
| Show room map and video | Only applies in Full mode. |
| Name template | Usually {patientName}. |
| Call-in text | Short line used in Full layout. |
| Simple call-in message | Multi-line full-screen text. Use tokens: {patientName}, {providerName}, {roomName}, {roomDirections}, {clinicName}. |
| Send call-in immediately | Skip the edit popup every time you press Call In. |
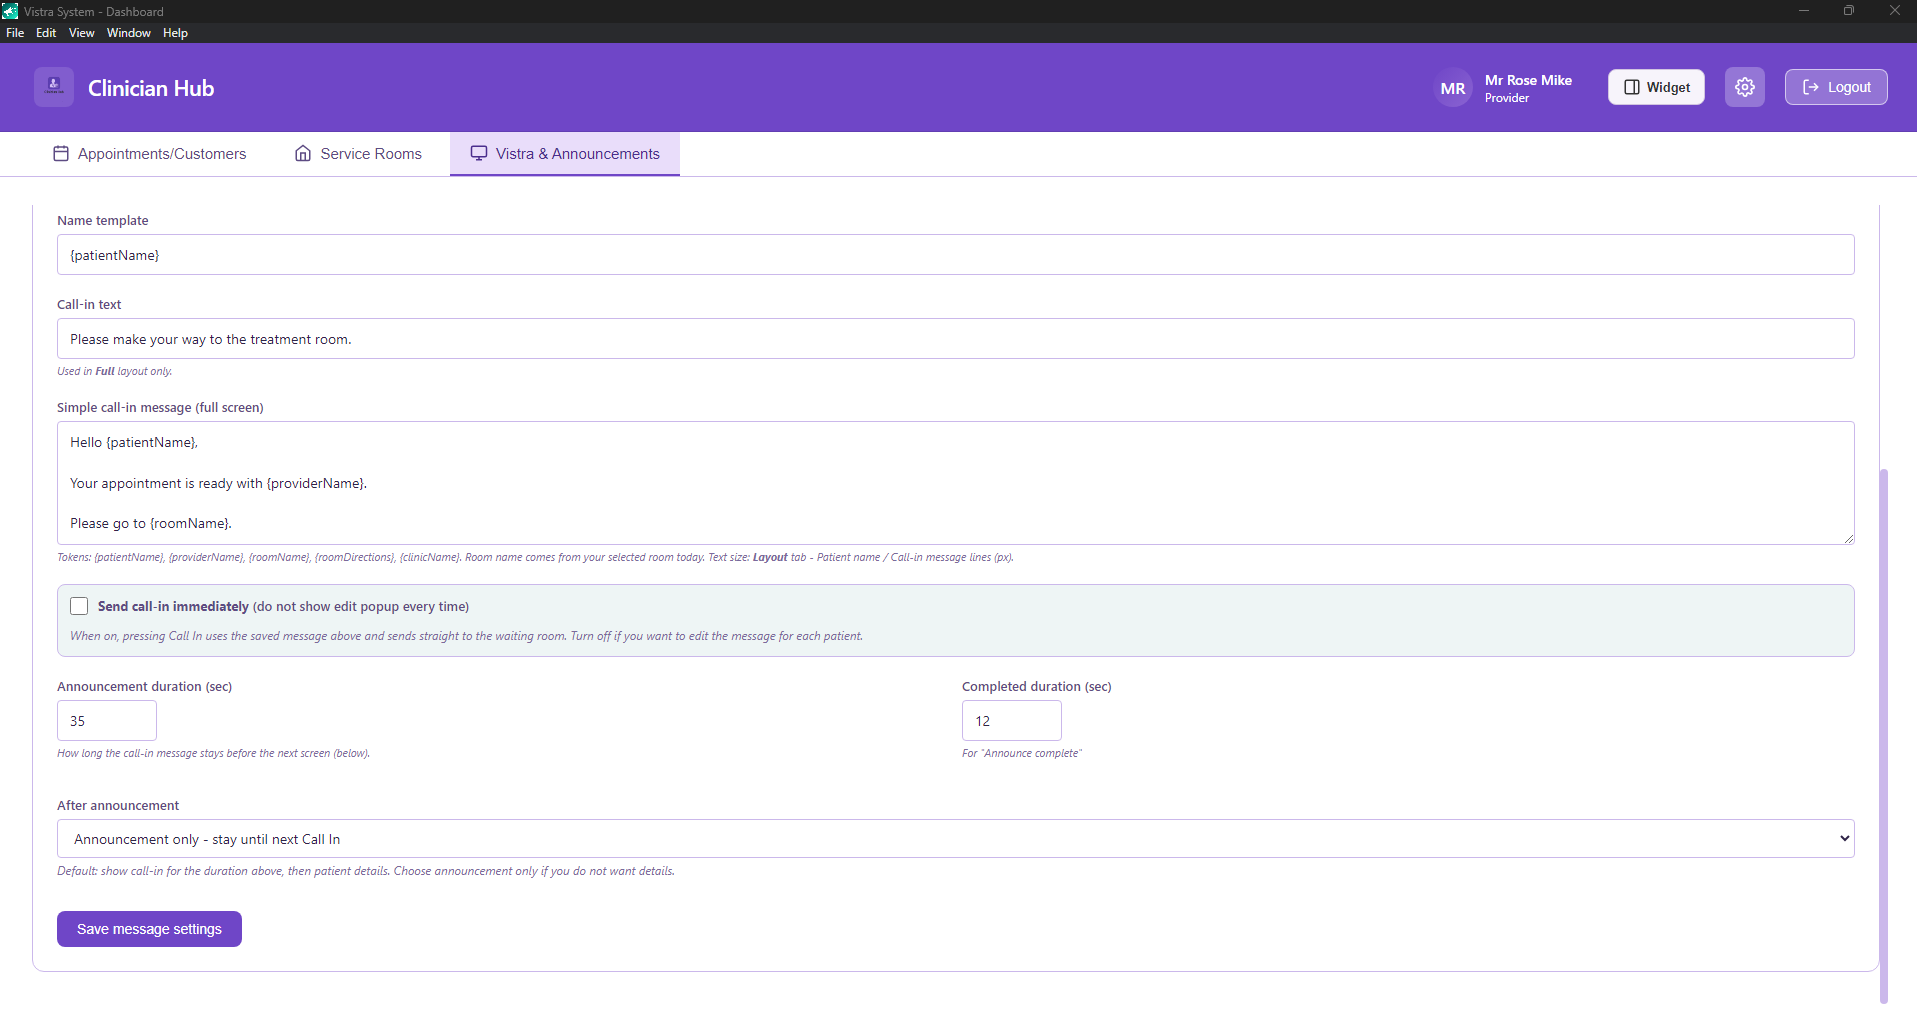
- Announcement duration (sec) — how long the call-in stays on screen.
- Completed duration (sec) - how long a "completed" state shows.
- After announcement — continue until next call-in, show running order, or show custom messages.
- Click Save message settings.
11. Voice (spoken call-in)
Where: Call-in → Voice
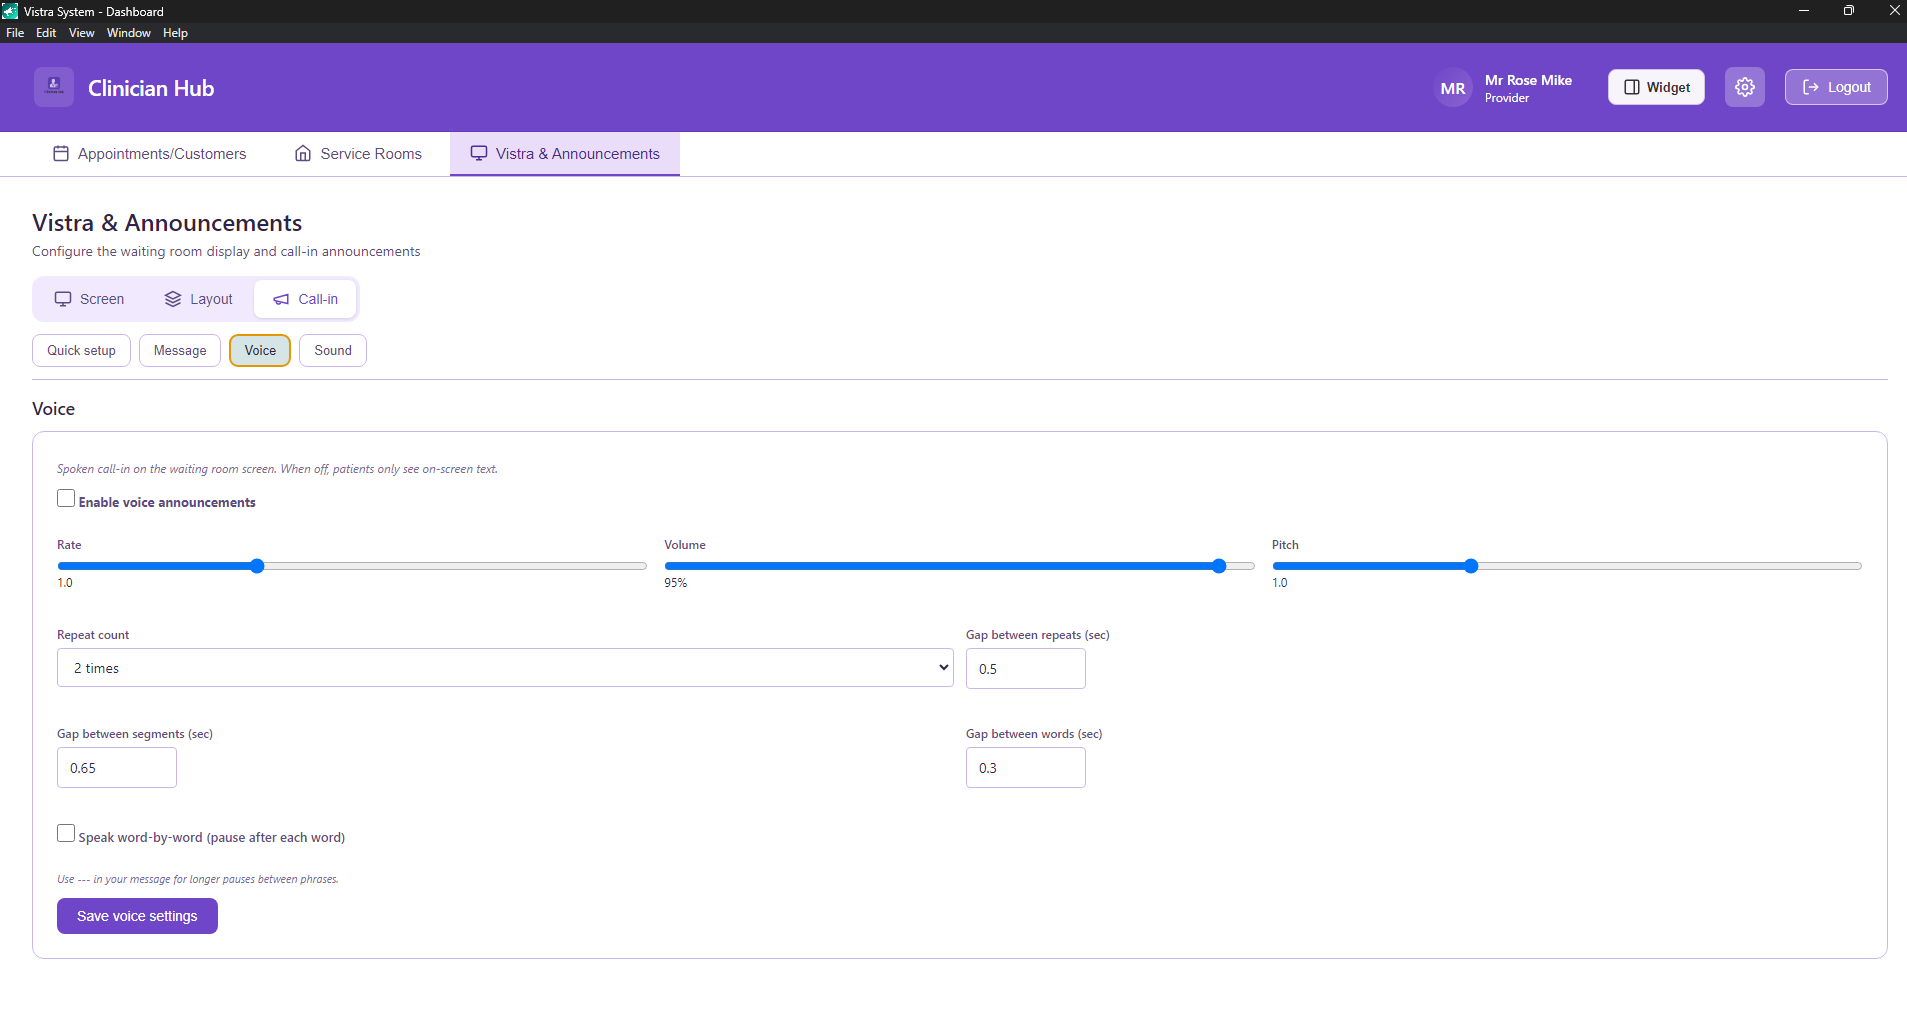
- Enable voice announcements — when off, patients only see text.
- Rate / Volume / Pitch — speed, loudness, tone.
- Repeat count — how many times the phrase is spoken.
- Gaps — pause between repeats, segments, or words.
- Speak word-by-word — slower, clearer reading.
- Tip: put
...in the message for longer pauses. - Click Save voice settings.
12. Sound & alerts
Where: Call-in → Sound
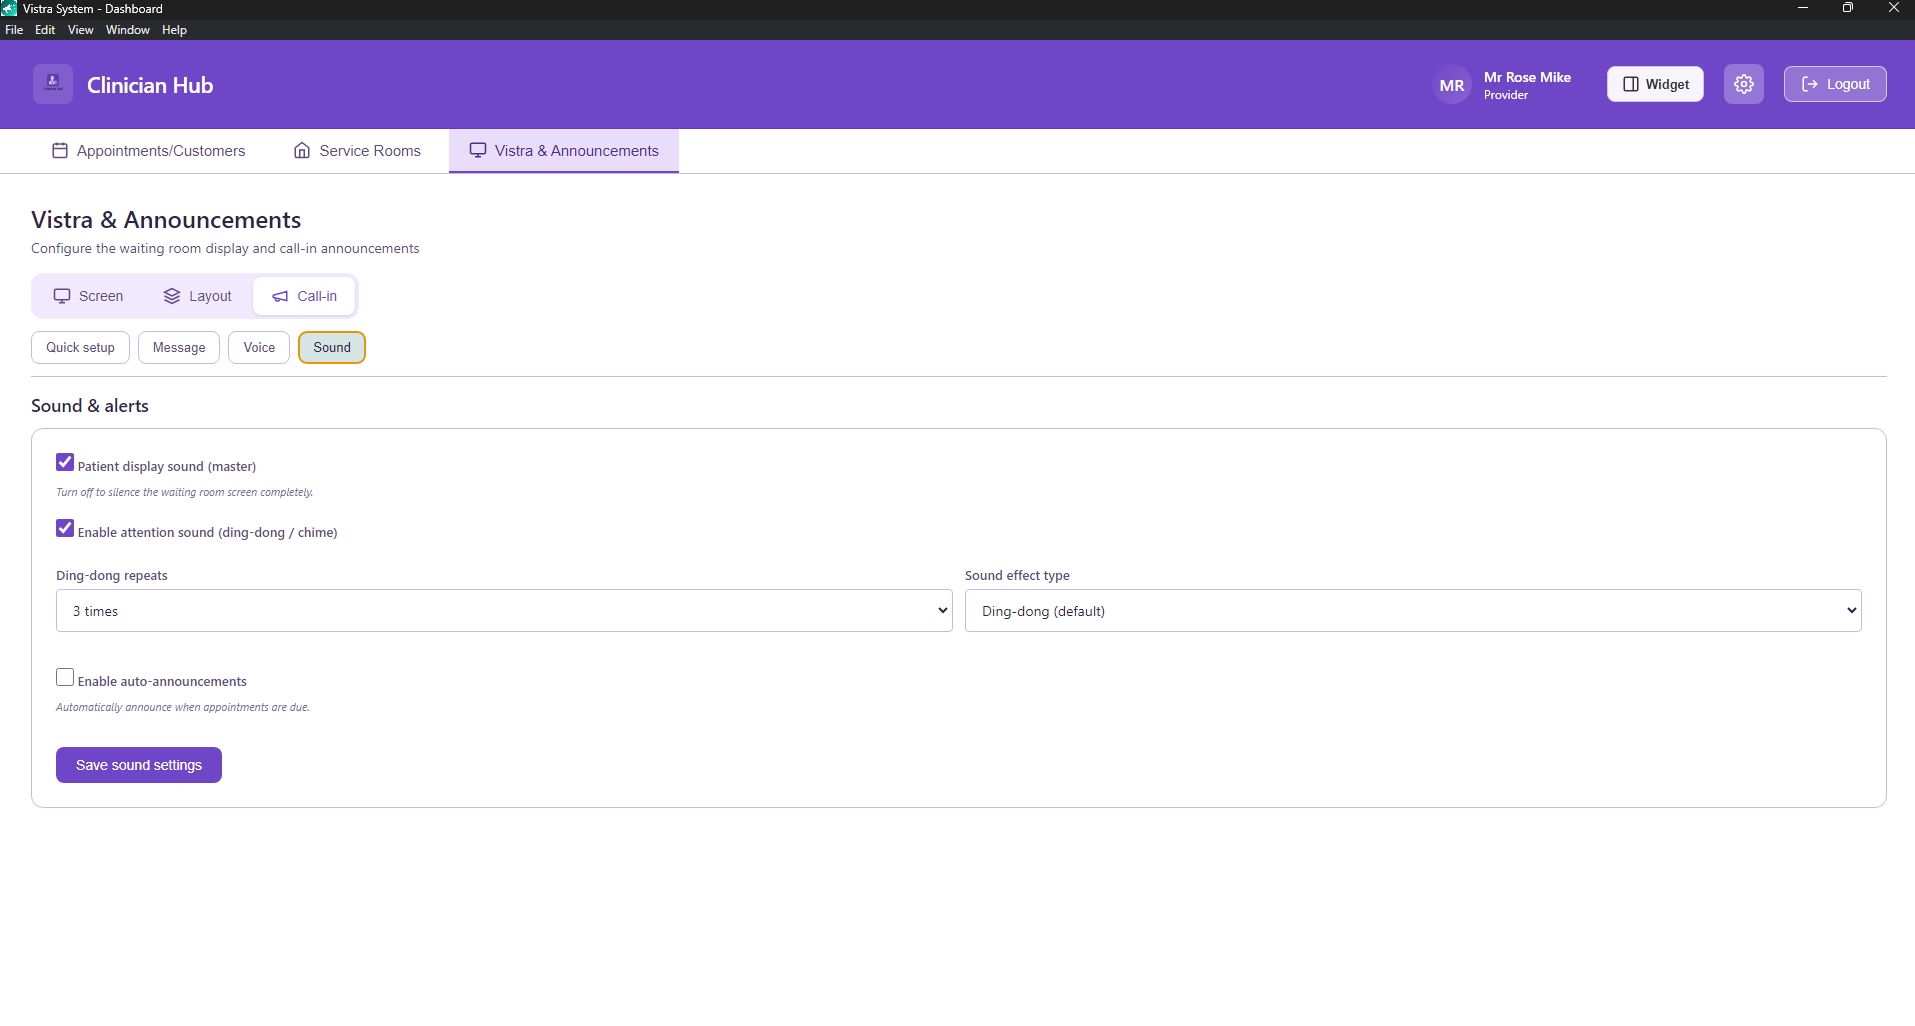
- Patient display sound (master) — turn off to silence the TV completely.
- Enable attention sound — ding-dong / chime before the message.
- Ding-dong repeats — how many chimes.
- Sound effect type — which chime to use.
- Enable auto-announcements — announce when appointments are due (optional).
- Click Save sound settings.
13. Settings · Account
Where: top bar → Settings (gear) → Account
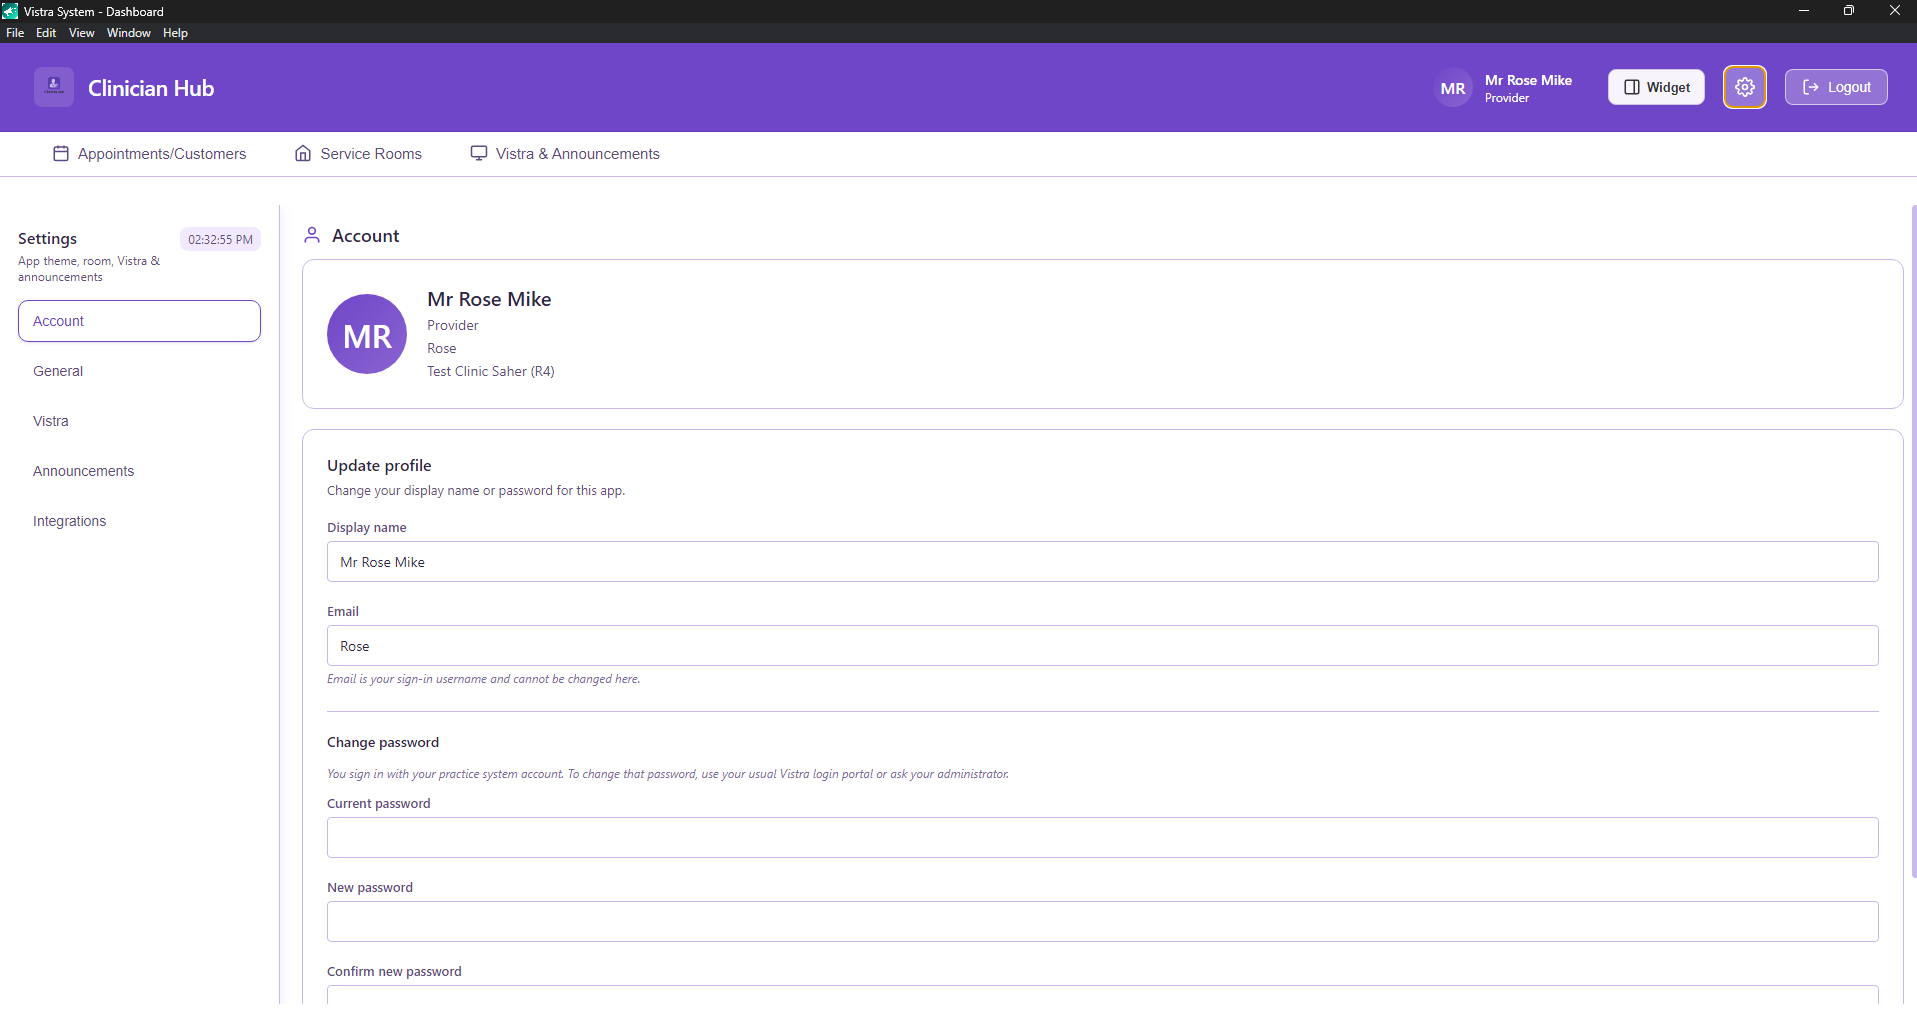
- See your display name, role, and clinic.
- Change Display name for this app.
- Email / username is your sign-in id — not editable here.
- Password changes follow your practice login rules (portal / admin), as noted on screen.
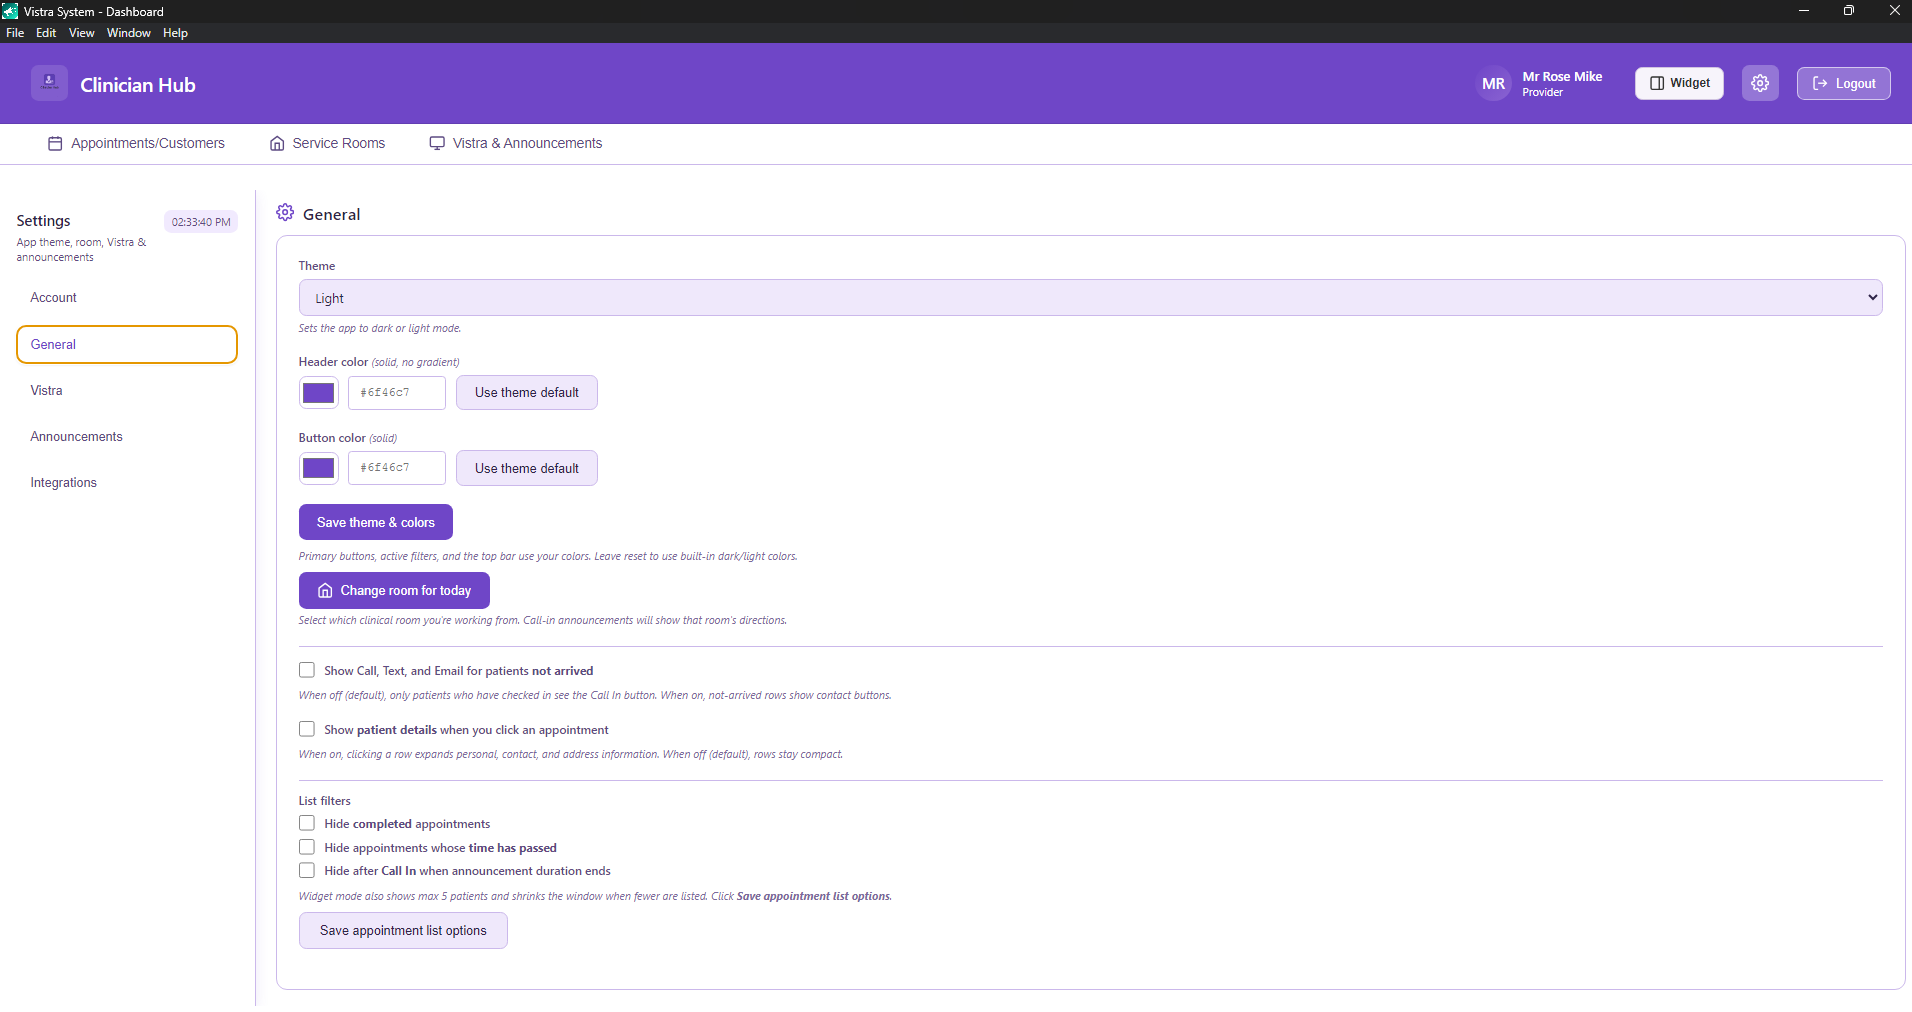
14. Settings · General
Where: Settings → General
| Setting | What it does |
|---|---|
| Theme | Light / Dark for the app (Clinician Hub), not the waiting-room TV. |
| Header / Button color | Solid colours for top bar and primary buttons. Save theme & colours. |
| Change room for today | Opens the duty-room picker again. |
| Show Call / Text / Email for not arrived | When on, contact actions appear even before check-in. |
| Show patient details on click | Expand a row for personal / contact / address info. |
| List filters | Same hide options as the appointments page; also affect Widget (max 5 patients). |
Sidebar also has Vistra, Announcements, and Integrations for deeper options.
Tips
- TV look = Vistra & Announcements → Layout. App look = Settings → General.
- Call In needs patient Arrived + a chosen duty room + Screen web server Running (or cloud display URL).
- After any Layout / Message / Voice / Sound change, press the matching Save button.
- Website Login is for clinic org dashboard or platform admin — day-to-day Call In is in the Windows Clinician Hub.